Sony Vegas has all the tools to create a video wall effect, but it is not an easy job and it will take a lot of time to create a complex video wall.
The DaviTools extension provides you with a graphical representation of your design and lets you edit your design with ease and precision. And the best news is: The extension is a 100% free!
Features
• Visual creation of your Video Wall
• Resize, reposition, rotate, etc. the individual Video Wall channels
• Add Borders
• Live update of changes on the preview window
• Save and Load your projects
• Quickly build Video Walls with presets
Get the plugin for free!
This plugin is completely free of charge and will save you a lot of time. If you can afford it please support this project by donating.
Download Installer for Sony Vegas 8 or 9
Download files for manual install for Vegas 10 and higher
Download files for Sony and Magix versions
Updates september 2014
1. Versions
The plugin is still used in the newest versions of Vegas Pro. I have read forum posts stating that it is working at least until version 12. My guess is that it will also work in version 13, but you have to try.
2. Borders
Are you missing borders? This is a known problem, the workaround is simple. First define a new preset border in Vegas, after this the plugin should also display borders.
3. Installation notes for version 1.1.1
The latest version (1.1.1) of the installer is for both Sony Vegas Pro 8 and 9. You can choose to install for version 8 or 9 during installation.
If you need the Video Wall plugin for a later version of Sony Vegas you have to manually install the files. Download the archive, extract the files and copy DaviTools VideoWall.png and DaviTools VideoWall.dll to the Vegas plugin folder. For Vegas 10 and 11 this is:
<user profile directory>\Application Data\Sony\Vegas Pro\<version>\Application Extensions
This location might be different for newer versions of Vegas.
Update september 2020
VideoWall for Magix versions of Vegas Pro
The VideoWall has been recompiled by HappyOtterScripts to work for Magix versions of Vegas Pro, starting from version 14.
Download and unzip the file and copy the desired extension (dll) file and icon into the appropriate folder.
For Magix versions: “C:\ProgramData\VEGAS Pro\Application Extensions”.
For Sony versions: “C:\ProgramData\Sony\Vegas Pro\Application Extensions”.
Documentation For DaviTools VideoWall
Installation
Download the VideoWall extension and execute the downloaded file. The installer will start and install the plug-in. When installation has finished start Vegas. Navigate to the Extensions menu option in the View menu. Click the DaviTools VideoWall option. The plug-in will open in the Dockable area as the first tab page (when you restart Vegas the extension will be placed in alphabetical order with other extensions you may have installed).
You are now set to start using the VideoWall extension.
VideoWall Basics
The VideoWall extension will let you add a so called channel for every video track or track event in your project. A VideoWall channel is connected to a video track by track number and event number. The first channel you add will be connected to the first video track, the second to the second track and so on. You can add more channels than there are events in your project but the channels will not be connected to any event. When you add more video events you can connect the channels manually by changing the track number and trackeventnumber properties.
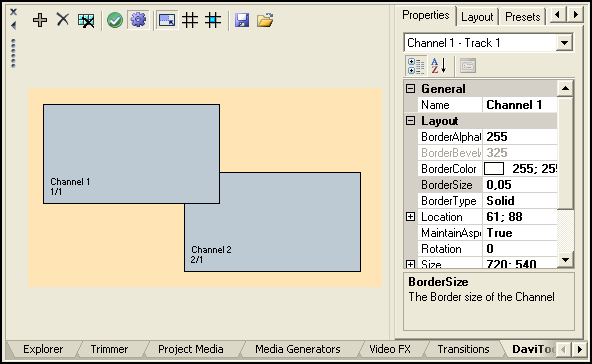
Above you see a screenshot of a VideoWall with two channels added. On the left side of the VideoWall window you see the VideoWall screen, here you add channels and move them around. At the top there is a button bar with several buttons that will let you add and remove channels, among other things. On the right side you see several tab pages, here you can change properties of the added channels, set the initial layout of channels and more.
Quick Start
Start off by adding some video tracks to your project. Now open the VideoWall window and click on the “plus” sign. A new channel is added and if you have a preview window open you can see the effect immediately. Add as many channels as you need. You can set the initial properties of a new channel on the Layout tab page. When you are done adding channels you can begin to layout your videowall. Click a channel to activate it and drag it to a new position on the screen. If you need more precision you can also move the channel by using the arrow keys. To move a channel to a specific position you can change its location in the property grid on the Properties tab page.
The Buttonbar
| Add a new channel to the videowall (Keyboard: Add key on the numeric keypad). | |
| Remove the selected channel from the videowall (Keyboard: Delete key). | |
| Remove all the channels from the videowall. Also clears the applied videowall settings from the video events. |
|
| Apply the videowall to the connected video events. | |
| Live Update the videowall. When switched on, everytime you make a change to the videowall layout it will be applied to the connected channels automatically. When switched off you have to apply the changes yourself. |
|
| Keep aspect ratio. When switched on the channel will keep its current aspect ratio when you resize it. |
|
| Show Gridlines. | |
| Snap to Grid. You can set the grid size at the settings tabpage. | |
| Save VideoWall. Saves your current videowall to file. | |
| Load a previously saved videowall. |
Channel Properties
Each channel in your videowall has properties which define things like Size, Location, Rotation and so on. We will now discuss these properties in detail.
| Name | A name you can use to describe the channel |
| TrackNumber | The Vegas tracknumber to which the channel applies |
| TrackEventNumber | The Vegas trackevent number to which the channel applies |
| Location | X and Y coordinates of the channel |
| Size | Width and Height of the channel |
| Rotation | Rotation angle of the channel (in degrees) |
| MaintainAspectRation | Determines whether the channel will strech the picture when the aspect ratio of the channel differs from the projects aspect ratio |
| BorderType | The type of Border of the channel |
| BorderSize | Size of the Border |
| BorderColor | Color of the Border |
| BorderBevelAngle | The angle of the bevel of a beveled border |
| BorderAlphaChannel | Alpha channel transparency of a solid border |
Initial Layout
On this tab page you can set the initial properties of a new channel. These include the new channel’s dimensions and location and its initial border settings.
Preset Video Walls
With presets you can quickly build some basic videowall configurations. Each preset has its own set of settings with which you can fine-tune the layout of the videowall. When you apply a preset, your current VideoWall will be cleared. Presets include:
| Rows and Columns | Build a VideoWall whith a variable amount of rows and columns. |
| Full Width Rows | This will build a videowall of full width rows that are distributed evenly. |
| Full Height Columns | This will build a videowall of full heidht columns that are distributed evenly. |
| Picture in Picture | A Picture in Picture effect in one of the four corners. |
| Large Picture in Picture | A centered Picture in Picture effect that fill most of the screen. |
| Dallas | A “Dallas Intro” effect with three columns. The two outer columns are rotated inwards to create the cone shaped column in the middle. |
Settings
On the Settings tab page you can modify several user settings. The settings will be saved and restored every session. You can load the default settings or revert to your last saved settings. Available settings are:
| Grid horizontal en vertical spacing | Sets the horizontal an vertical spacing of the grid. |
| Grid color | Sets the color of the grid lines. |
| Background color | Sets the background color of the VideoWall work area |
| New channel color | Sets the color of newly added channels |
| Create channel for each Event | When you check this option, each time you add a channel, it is connected to the next available Video Event. When you uncheck this option newly added channels are connected to the next available Video Track. |
| Clear unused events | When you check this option, each time you apply the VideoWall all of the Events on the timeline that are not included (i.e. not connected to a channel) will be “cleared”. Clearing applies to the Pan/Crop settings on the first frame and any Sony Border settings. |
| Confirm building preset VideoWall | Check this option to get a confirmation dialog before a preset VideoWall is applied. |
| Show channel info | Check this option to have the channel’s name and Track/Event connection displayed on the channel. |
Release Notes
1.0.0
First version of the VideoWall extension, this version was specific to Vegas 8.0b, users of prior versions of Vegas 8 were not able to use the extension.
1.1.0
Corrected the problem with versions prior to Vegas 8.0b The extension should now work for all Vegas 8 versions. No other changes.
1.1.1
Adapted the installer to give a choice for installation on Vegas Pro 8 or Vegas Pro 9.
September 13, 2020
Recompiled for Magix versions starting from version 14.